
Sending Emails On Behalf of Someone Else in SaaS Solutions Using SendGrid and .NET
Introduction
In the modern SaaS landscape, flexibility is key. One commonly sought-after feature in Helpdesk and similar software is the ability to send emails on behalf of a different domain—your customer’s domain, for instance. However, spam prevention and domain authentication can make this tricky. If you’re building a SaaS solution that deals with email services, like my current project Scitor, this blog post is for you. In it, I’ll explain how I implemented a secure way to send emails from my customer’s domain, using SendGrid and .NET.
The Problem
When implementing Scitor, a Helpdesk SaaS that accepts emails and converts them into GitHub discussions, I ran into a challenge. The solution needed to send replies back to the original recipient’s email address, and many customers wanted those emails to come from their own domain.
However, due to spam prevention measures, you can’t simply send emails from a domain you don’t own or haven’t authenticated. This is not only bad for your spam reputation; SendGrid explicitly forbids it unless the ‘from’ email address has been verified.
The Solution: Domain Authentication
I found a way to allow customers to authenticate their domain without giving them access to my SendGrid account. I also did not have a GUI or admin interface for my solution, so I needed to automate the process as much as possible within the GitHub discussion.
Step 1: The /authenticate-domain Command
The first step is to create a command—/authenticate-domain that customers can use to begin the domain authentication process. When a customer issues this command by adding it to a comment in the discussions, the following code creates a domain registration at SendGrid via the StrongGrid library:
public async Task<DomainRegistrationResult> CreateDomain(string domain)
{
    var result = await _strongGridClient.SenderAuthentication.CreateDomainAsync(domain);

    return new DomainRegistrationResult(
        result.Id,
        result.IsValid,
        new DNSRecordResult(result.DNS.Dkim1.Data, result.DNS.Dkim1.Type, result.DNS.Dkim1.Host),
        new DNSRecordResult(result.DNS.Dkim2.Data, result.DNS.Dkim2.Type, result.DNS.Dkim2.Host),
        new DNSRecordResult(result.DNS.MailCName.Data, result.DNS.MailCName.Type, result.DNS.MailCName.Host)
    );
}

public record DomainRegistrationResult(long DomainId, bool IsValid, DNSRecordResult Dkim1, DNSRecordResult Dkim2, DNSRecordResult CName);

public record DNSRecordResult(string Data, string Type, string Host);
The function returns DNS records that the customer needs to configure on their end.
Step 2: Configuring DNS Settings
I output these DNS settings into the GitHub discussion as an additional comment. The customer is then responsible for adding these DNS records, a process that can take some time and differ per DNS provider.

Step 3: The /verify-domain Command
Once the customer has configured their DNS settings, they issue the /verify-domain command. This function verifies the domain using SendGrid’s API:
public async Task<DomainValidationResult> VerifyDomain(long domainId)
{
    var result = await _strongGridClient.SenderAuthentication.ValidateDomainAsync(domainId);
    return new DomainValidationResult(
        result.DomainId,
        result.IsValid,
        new DNSRecordValidationResult(result.ValidationResults.Dkim1.IsValid,
            result.ValidationResults.Dkim1.Reason),
        new DNSRecordValidationResult(result.ValidationResults.Dkim2.IsValid,
            result.ValidationResults.Dkim2.Reason),
        new DNSRecordValidationResult(result.ValidationResults.Mail.IsValid,
            result.ValidationResults.Mail.Reason)
    );
}

public record DomainValidationResult(long DomainId, bool IsValid, DNSRecordValidationResult Dkim1, DNSRecordValidationResult Dkim2, DNSRecordValidationResult CName);

public record DNSRecordValidationResult(bool IsValid, string Reason);
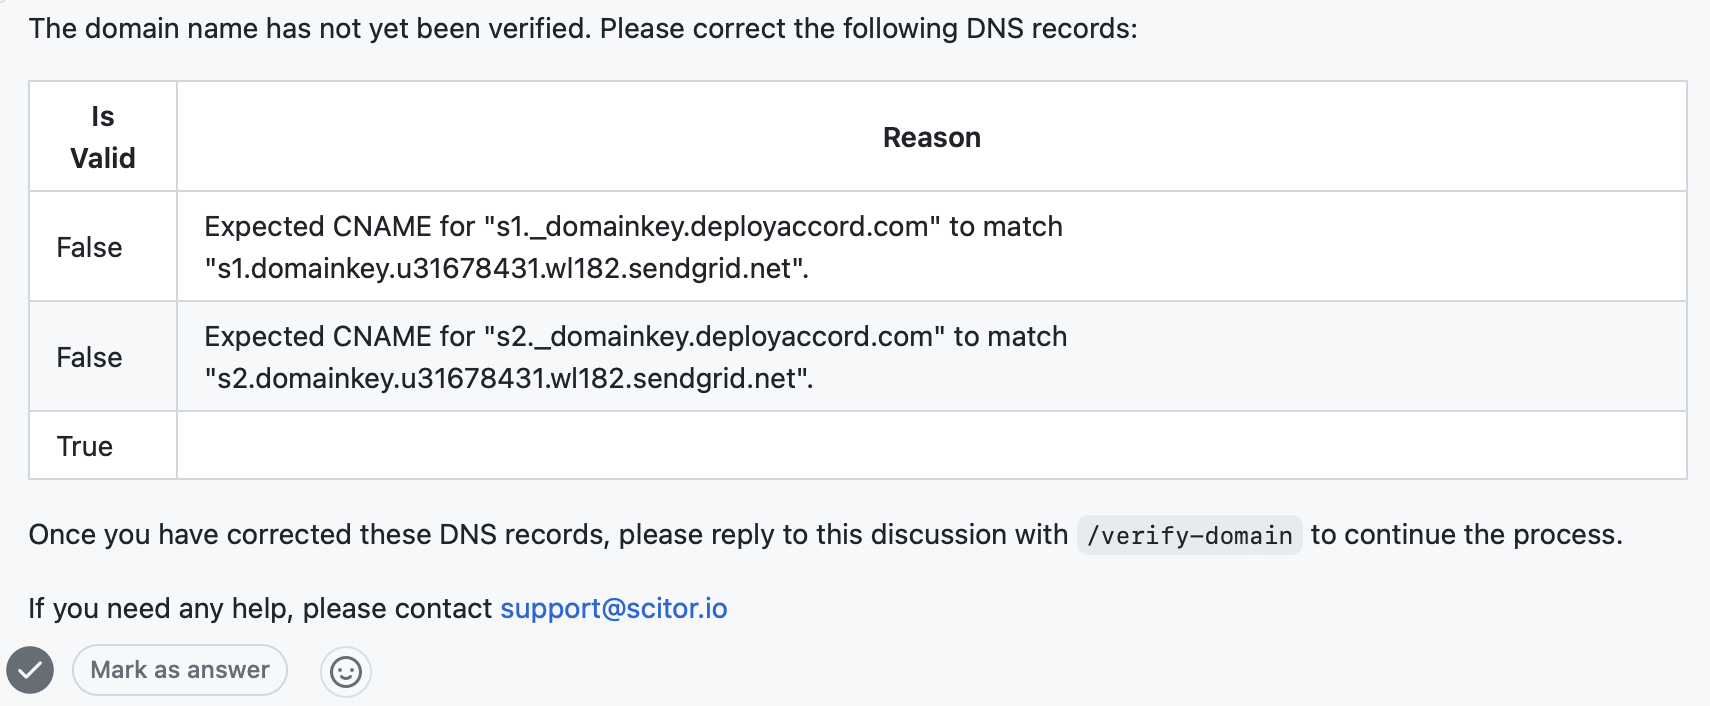
When all records are validated successfully, the customer can start using their own domain as the sender. If not, I list the problems that still need to be fixed.
I do store the returned domainId in my database, so I can use it to remove the domain later if needed and check if the verification has been completed or not. There is also an explicit /delete-domain command that customers can use to remove the domain from my SendGrid account.
Conclusion
Domain authentication may sound complex, but with a bit of code and the help of SendGrid’s StrongGrid library, it can be automated to a large extent, even for customers who don’t have direct access to your SendGrid account. This ensures that your SaaS can send emails from different domains while maintaining good spam reputation and adhering to SendGrid’s rules.


Leave a comment